
It’s a very common thing to have multiple hard drives in our possession these days. With all the data and media that we have with us, the inbuilt storage in our computers prove insufficient. External HDDs also provide easy portability for the media. But we always face an issue when we want to share our media or even the HDD space with others in our own home or on our internal network. One solution is to attach the HDD to the computer and configure it as a shared drive. But that would require a computer which is running 24×7 so that the drives are available at any given time to anyone. Not an ideal solution.
Another method is to configure a NAS or Network Attached Storage. NAS is basically a storage attached to a network device(typically a server, but can also be a dedicated controller) which is connected to a network and runs 24X7. You do get NAS devices in market but these devices are typically as costly as a single 2TB drive and are normally beneficial for higher speed transfers. The NAS configuration which I plan to discuss here, will give you transfer speeds of about 4-5 mbps over local network and should be suitable for home/home office networks. And we use a versatile computer which has very low footprint in terms of space and power consumption. The Raspberry Pi is one of the best suited computer board for this project.
Before you go further you need:
- A Pi with Raspbian installed and connected over you local network. Use this tutorial for the same.
- A powered USB hub sufficient to power your HDDs. Buy here based on number of HDDs you have
Warning : Do not attempt to power up your HDDs via the Raspberry Pi USB ports since the pi can handle only about 2.5 amps of current through it and may burn out in case overloaded.
So let’s get started.
(Note : This guide has been drafted based on my installation experience, which was further assisted by the guides available at howtogeek.com and instructables.com . Any errors during the installation, you can leave me a note or you can check the guides on their websites. Both websites listed different methods and I couldn’t get mine configured using them individually. But I succeeded when I followed both the guides together)
- Connect your HDDs to the USB hub and connect the Hub to one of the USB ports on the Pi.
- Open up shell via SSH( or terminal in case you have connected the keyboard/mouse and screen to your Pi)
- Run the commands sudo apt-get update and sudo apt-get upgrade to update your Pi installation and repositories.
- If your HDDs are NTFS format, you will need to run the following command in terminal.
sudo apt-get install ntfs-3g
This will get you Pi ready to understand the ntfs format on your HDDs.
Next step is to identify your drives
- Type ls –l /dev/disk/by-uuid
- The output of this command will be similar to below:

- Here sda1, sdb1, sdc1 denotes the external HDDs. The number will vary as per the HDDs connected by you. We are interested in the 16 digit hexadecimal UUID against each of these. Note down the 16 digit codes and the corresponding HDD identifiers. eg. sda1 – 1C0CA2830CA25812 in the example above.
- Next run code ls –l /dev/disk/by-label
- The output will be something like this:

- As you can see, my labels are Transcend, Storite and WD for sda1, sdb1 and sdc1 respectively. These are the actual labels which you have given to the HDDs. Note these down and match them with the UUID. So in my case it will be sda1 – 1C0CA2830CA25812 – Transcend.
- Now that we have identified the HDDs, we need to mount these drives. But before that we create a location to mount these drives.
- Run code sudo mkdir /media/DRIVE_NAME . eg. for my transcend drive, I created directory using sudo mkdir /media/transcend
- Do this for all the drives that your have connected.
- Next, mount each drive with the following command for each instance:
sudo mount -t ntfs-3g -o uid=pi,gid=pi /dev/sdxx /media/DRIVE_NAME
- Where sdxx is sda1, sdb1, sdc1 etc and DRIVE_NAME is the corresponding mount point which you created earlier. So for my transcend drive the command will be:
sudo mount -t ntfs-3g -o uid=pi,gid=pi /dev/sda1 /media/transcend
- Do this for all the drives.
- If you have fat32 or ext4 drives, suitably modify the command:
- ntfs-3g for NTFS drives
- vfat for FAT32 drives
- ext4 for ext4 drives
- The drives should mount everytime we reboot. So we need to add it to startup script.
- Run sudo cp /etc/fstab /etc/backup_fstab
- Then run sudo nano /etc/fstab
- Add the following correspondint to each drive
/dev/sda1 /media/transcend auto noatime 0 0
Use the correct drive identified sdxx and the corresponding correct DRIVE_NAME for each HDD.
- Restart the Pi using sudo reboot
- Next step is to install samba.
- Run sudo apt-get samba samba-common-bin
- Once installed, backup the samba configuration file before proceeding:
sudo cp /etc/samba/smb.conf /etc/samba/backup_smb.conf
- Run sudo nano /etc/samba/smb.conf
- In the configuration file that opens up, ensure that the workgroup is your local workgroup for your network. Ideally its WORKGROUP for windows. Modify it if you are using something else.
- In the Authentication section, enter security = user to enable verification
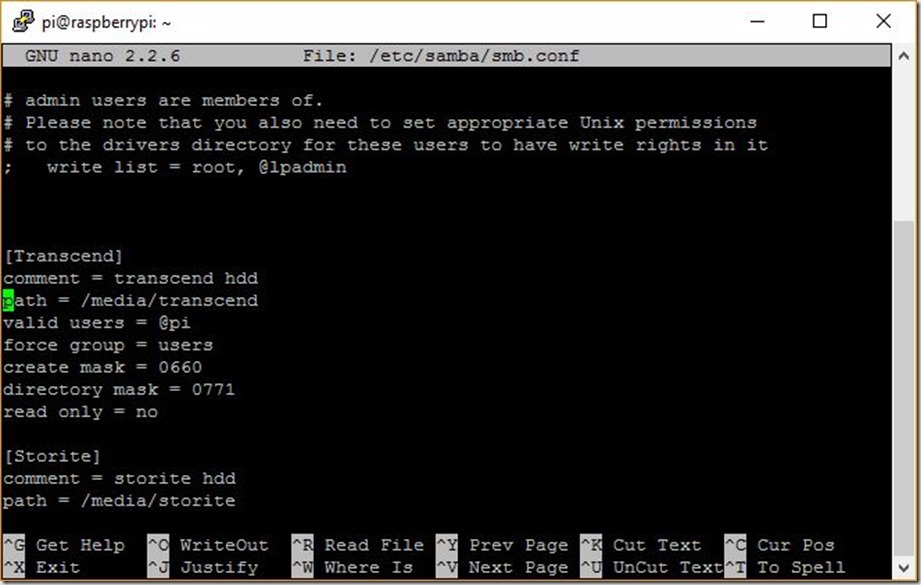
- Now scroll to the bottom of the file and add your drives as follows:

- Here valid user = @pi is the username I selected. You may select anything you want eg. valid users = @josh .
- You may also choose to share specific folders inside the HDD instead of the entire HDD. Modify path if that is the case. The read only attribute specifies the modification rights and the no flag specifies that the users on network can read as well as write to the shared drive/folder.
- Save using ctrl+X, say yes and hit enter.
- Run sudo /etc/init.d/samba restart
- Add user to give access to the shared drive
- sudo useradd josh -m -G users
- sudo passwd josh
- You will be prompted to enter a password twice.
- Next enter the command sudo smbpasswd –a josh
- Create password on prompt
- Restart samba using sudo service smbd restart
- The HDDs should be visible to you on other computers on your network. You can configure it as a network drive. You will need to specify username and password once for access.
Next time, we will see how to configure DLNA server on your Pi to share the media files to your DLNA compliant devices.
1 comment for “How to setup Raspberry Pi – NAS”