
If you follow tech world, you must surely have come across the name “Raspberry Pi” which has been making waves in its field for about 5 years. I had provided a basic insight regarding credit card sized(and thumbnail sized) computers in my previous post. These tiny boards cost from about 5$ to well over 100$, each with its own specialties. And they are the favorites of the geeks for small tasks, dedicated application or plain hobby projects.
But its not just the geeks who have the competence to use them. A common person like any of us can pick one up and configure with a little bit of research(nothing anyone can’t handle. Some basic configurations are straight forward.) You can use it as a simple linux based computer, a media server, a network attached storage controller, create a magic mirror, an interactive AI and pretty much anything you may want with a bit of advance tutorials.
The aim of my todays blog is to guide you through the installation of Raspbian and create a backup image of the setup. The back up will help you to copy the sd card in an image format which can be overwritten anytime you feel that the OS is not behaving well. I will also explain how to setup your pi to be used via a remote computer, thus dispensing the need to connect it to a monitor, mouse or keyboard. We shall set it up so that the pi is on static IP and easily accessible via shell or via VNC.
Note that the Raspbian OS is based on Debian distribution of Linux, so even though you get a GUI, be prepared to try out command line for advance configurations. They are fun to learn and not very difficult to remember(or to google for that matter)
What you need
- A Raspberry Pi 3 with a 2.5 A 5V power supply(micro usb pin)– buy it here and here
- A 16GB – 32GB micro SD Class 10 card – better a 32 GB version if you plan to setup more number of applications – buy it here
- A keyboard/mouse/monitor(HDMI TV will do) for initial setup
- NOOBS – download here (NOOBS is a “New out of Box Software”, a minimal intervention installer with OS packages built in)
Whenever you plan to buy a case for the pi, consider possibility of adding a fan and GPIO headers. Also consider that you may need to remove the micro SD card time and again in case you are using another card for another project. Make sure that the SD card is readily accessible.
Install Raspbian
Before you try to install raspbian on to your sd card, you will need to format in to Fat32 file system. You can use SDformatter for the purpose. Once the SC card is formatted, extract the downloaded NOOBS image in to the root of the SD card.
The installation method below gives the installations of only Raspbian OS with PIXEL desktop. You should be able to install and use any other OS listed within the list, once you are a little familiar with how it works.
- Insert the card in to you pi in the card slot.
- Connect the HDMI cable, keyboard and mouse to the pi.
- Connect the power source.
- The pi will start automatically. You will be taken to the list of available/downloadable OSes. Select Raspbian jessie with full desktop.

- On the top left hand corner, you will find a icon shaped like a hdd. It is your install button. Click on the button to install Raspbian.
- Go have a cup of tea cause it takes 15-20 minutes to install. Yes, no further intervention necessary.
- When you come back from your short break, you will be greeted with a message saying that OS is installed. Click ok. The system will reboot.
That completes the installation part. Once the system reboots, it will take you to the PIXEL desktop. It is essentially similar to windows desktop with the taskbar and menu docked to the top. But don’t let the appearances fool you. The core on which it is built is rock solid, highly customizable and very secure.
The round raspberry on top left gets the things started for you. Navigate around to get a feel. The other important icons which you would be using time and again are:
- The blue globe near the raspberry, which is essentially the web browser.
- The folder icon, which is used to navigate the file system
- The black window, which I guess you know from your windows days, the console or the terminal
Navigate around the icons, they wont kill the system for now.

Let’s change the default password
Ok, first thing’s first. We secure out pi before we connect it to network. Click on the terminal icon. The terminal, as below, will open up.

Here, the “pi” is the current user and raspberrypi is the hostname. Let’s change the password. Type the following code in front of the prompt:
passwd
You will be prompted to enter the current password. The factory default password for user pi is raspberry. Enter the password and you will be asked to type in the new password, two times. Enter it twice and the password will be changed.

Let’s setup static IP
Setting up a static Ip to your pi makes it easy to access it from another machine
- Open terminal and type in sudo nano /etc/dhcpcd.conf
- Here sudo mean you are telling the system to do something as a superuser. Something similar to run as administrator in windows.
- nano is a text editor for terminal. another text editor available for GUI is leafpad. So when you are logged into desktop, you can type in sudo leafpad…… instead of sudo nano….. But it is a good practice to use nano since, once we switch off the GUI, console is all that you have until you switch it back on again. You will be able to use only the arrow keys and enter button in nano.
- dhcpcd.conf is the configuration file for the network and etc is the directory where it is stored
- scroll down to the bottom of the file that opens up and type in the following code:
(Edit 19 August 2017 : Raspberry Pi foundation has released the new version of Raspbian codenamed Stretch(old was Jessie). The procedure for setting up static IP is different and listed below)
interface eth0
static ip_address=192.168.1.95/24
static routers=192.168.1.1
static domain_name_servers=192.168.1.1
interface wlan0
static ip_address=192.168.1.96/24
static routers=192.168.1.1
static domain_name_servers=192.168.1.1
In the above code:
- you can use either wlan0 or eth0 or both, depending on what kind of connectivity you plan. wlan0 is for wifi and eth0 is for wired connection.
- static ip can be of your choice based on your network configuration (eg. some networks are configures 192.168.0.xxx). Make sure to keep the number /24 in the settings.
- static router specifies the router to which the pi is to be connected. My router ip is 192.168.1.1
- similarly static domain name servers can be as per your network configuration. My home network devices get their DNS from my router so I have entered my router address.’’
- Press ctrl + S to save the settings.
- Press ctrl + X to close the editor.
Edit 19 August 2017 : New procedure to setup static IP on Raspbian Stretch follows
In Raspbian Stretch, the network interface is no longer recognised as eth0 or wlan0. So we need to first find what it is called(different for different machines.)
- type command ifconfig
- you should get results like below
enxxxxxxxxxxxxx: flags=4163<UP,BROADCAST,RUNNING,MULTICAST> mtu 1500
inet 192.168.1.98 netmask 255.255.255.0 broadcast 192.168.1.255
inet6 fe80::35e0:4ba4:69da:a857 prefixlen 64 scopeid 0x20<link>
ether b8:27:eb:2d:0c:50 txqueuelen 1000 (Ethernet)
RX packets 22310 bytes 13188104 (12.5 MiB)
RX errors 0 dropped 6 overruns 0 frame 0
TX packets 11464 bytes 6083883 (5.8 MiB)
TX errors 0 dropped 0 overruns 0 carrier 0 collisions 0
lo: flags=73<UP,LOOPBACK,RUNNING> mtu 65536
inet 127.0.0.1 netmask 255.0.0.0
inet6 ::1 prefixlen 128 scopeid 0x10<host>
loop txqueuelen 1 (Local Loopback)
RX packets 25 bytes 1484 (1.4 KiB)
RX errors 0 dropped 0 overruns 0 frame 0
TX packets 25 bytes 1484 (1.4 KiB)
TX errors 0 dropped 0 overruns 0 carrier 0 collisions 0
- The entire alphanumeric code above in yellow is how my eth0 is recognised. It will be something else for you.
- Now type command sudo nano /etc/dhcpcd.conf
- At the bottom of the file that opens up, add the following. Ensure you add the correct addresses for your network setup.
interface enxxxxxxxxxxxxx
static ip_address=192.168.1.98/24
static routers=192.168.1.1
static domain_name_servers=192.168.1.1
You can now connect to the home wifi, of ethernet, or both. The up and down arrow on your top right hand side of desktop will help you join a wifi network.
Once connected to internet, it would be a good practice to update your system before you go further.
Open the terminal and type in sudo apt-get update. Once this command is executed, use sudo apt-get upgrade. It is a good practice to use this two commands before installing any new software on your pi. They are used to update any packages which are installed on your pi and which have been updated ever since you installed. Fresh OS installations normally have some major updates available.
Let’s do away with that monitor, keyboard and mouse(Optional if you are comfortable running the show remotely via terminal. But that’s what these board is all about….accepting the challenge)
So now that you have changed password and set up static IP, let’s go a bit deep and dispense away that monitor. Only of course if you have a computer or a laptop from where you can control it. Remember, though the pi can be used as a regular desktop computer, it will run only may be one or two applications together because it simple lacks the resources needed for heavy multitasking. It is best suited for headless apps and servers, similar to ones which I have listed out in the beginning.
Open the terminal and type in sudo raspi-config
- This will open the configuration tools for raspberry pi. Thins this as a BIOS for your PC with more configurations.

- Use the arrow keys and enter button to select Interfacing Options.
- Select SSH and enable it. Next Select VNC and enable it. Selection is by pressing enter and arrow keys.

-
Select Back.
-
Select Boot Options
-
Select Desktop/CLI
-
Select B2 Console auto login.

- Select finish and reboot.
- Move over to your regular use PC.
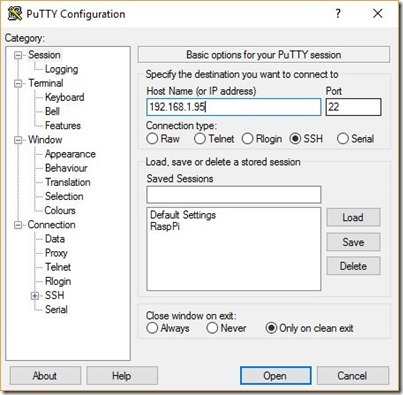
- Download and install a SSH client like putty. Run Putty on your pc.
- Enter the IP address in the hostname field, enter a recognizable name in saved session field and click save

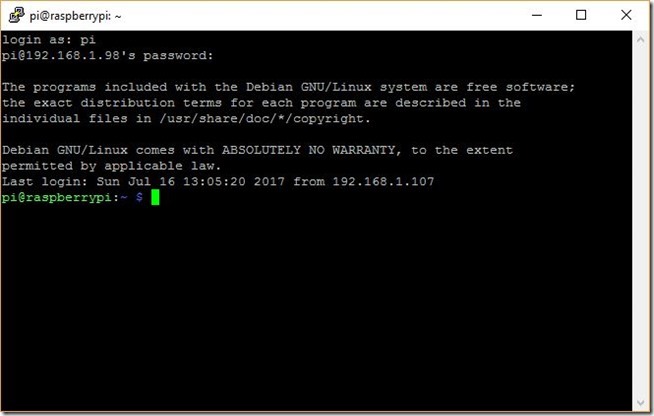
- Now double click on your saved session and a terminal window should open up asking you to enter username. Enter pi.
- Next enter the password which you have set.
- This will take you to console from where you can control your pi.

Since you have configured only console login via configuration tools, you can access only via putty(SSH). If you configure to boot in desktop mode via configuration tools, you can use VNC to login to desktop too. You will need to download VCN on your computer to do that. Try it out, its easy. If in doubt, just leave a query. You can always go back to desktop login by using sudo raspi-config.
Let’s backup
Let’s try the easy way to backup today.
- Download win32 disk imager and install on your computer.
- Shut down the raspberry pi, remove the card and insert it in your computer(via SD card reader)
- Run win32 diskimager.
- Select the device to backup(our sd card).
- Select a backup location on your computer and give a file name (eg, raspbianbackup.img)
- Click on Read

- The backup will automatically be created at the specified location.
- Next time, the setup on you pi doesn’t work as it should, run this program again and select this image we have created. Click write instead of read this time, to overwrite on the card.
In case you have any doubts or anything very clear or seems to be wrong, kindly leave a comment. In the next tutorial I plan to explain setting up a NAS server, a DLNA server and an always on bit torrent box.
Till then!!
3 comments for “How to install Raspberry Pi”